
Inspection Module - The Complete Guide for Dummies
A plain-language, end-to-end handbook for the Zometric OMS Inspection Module
This is the one-stop guide. If you are brand new, start at the top and read straight through — every term is explained in simple words the first time it appears. If you already know the basics, jump to the section you need using the contents below. There is a glossary and a set of quick "How do I…?" recipes near the end.
Who is this for? Anyone — quality engineers, inspectors, approvers, managers, or a developer who just wants to understand what the product does. No prior quality-control knowledge is assumed.
1. The big picture
What is "inspection" in the first place?
Imagine a factory that receives a truckload of 10,000 bolts from a supplier. Somebody has to answer one simple question: "Is this batch good enough to accept, or should we send it back?" Checking all 10,000 bolts one by one would be slow and expensive. So instead we check a small sample — say 200 bolts — and use proven statistical rules to decide about the whole batch. That is quality inspection. The Inspection Module is the software that runs this whole process in an organised, auditable way. It tells the inspector which characteristics to check, how many items to sample, how to record what they find, and then it decides (Accept or Reject) using the rules you configured — and keeps a permanent record of everything for audits.
What can this product actually do?
• Define the rules for inspecting each part from each supplier/customer (called an Inspection Plan).
• Guide the inspector step by step: exactly what to measure, how many samples, and give them clean data-entry screens.
• Automatically decide whether a batch passes or fails, based on international sampling standards (ANSI Z1.4, c=0, ANSI Z1.9) or your own custom standards.
• Route decisions to an approver when a human sign-off is needed.
• Adjust how strict inspection is over time based on a supplier's track record (this is called switching — reward good suppliers with lighter inspection, punish poor ones with tighter inspection).
• Track corrective actions when a supplier gets blocked.
• Send notifications when important things happen.
• Produce reports on performance and full inspection audit trails
A key idea: this is regulated, audit-grade software
Because inspection results can affect product safety and legal compliance (think medical devices, aerospace, pharma — 21 CFR Part 11), the system never quietly deletes or edits history. When something needs to change, it creates a new version and keeps the old one. You'll see this theme again and again: nothing is ever truly erased.
2. The 30-second mental model
Here is the entire module in five sentences:
1. A Quality Engineer sets up an Inspection Plan — the rulebook for inspecting one Part from one type of transaction (Incoming from suppliers, or Outgoing to customers).
2. When a real batch arrives, an Inspector creates an Inspection Lot (a real inspection event for a real quantity) based on that plan.
3. The inspector opens the lot and records what they found — counts of defects, and measurements — on easy data-entry screens.
4. They hit Submit, and the computer applies the sampling rules to Accept or Reject the lot. Depending on settings, an Approver may confirm the decision.
5. The result is stored forever, feeds reports, and may adjust future inspection strictness for that supplier. Everything else in this guide is detail on those five steps.
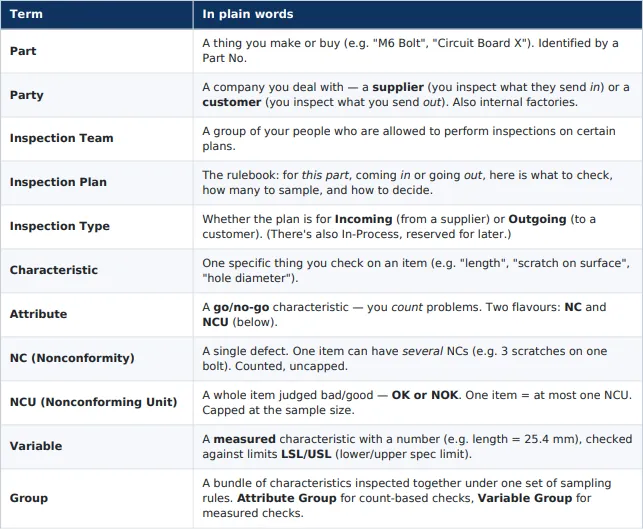
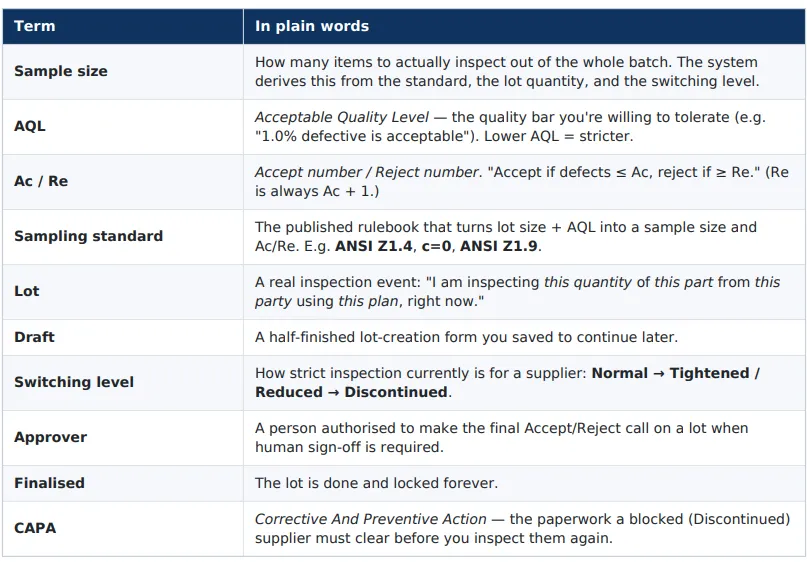
3. Words you need to know
Read this once and the rest of the guide will feel easy. (There's a fuller A–Z glossary at the very end too.)
4. Who does what: the three roles
The module is built around three kinds of users. One person can wear more than one hat
The Quality Engineer (QE)
The rule-maker. Sets up teams, parties, and — most importantly — Inspection Plans. They decide what gets checked, how strictly, and who approves. They live mostly in the Configure area. (Technically: users with the "change inspection plan" permission.)
The Inspector
The doer. When a real batch arrives, the inspector creates a lot, physically checks the samples, and records the results. They live mostly in the Inspect area. (Technically: members of the plan's assigned Inspection Team.)
The Approver
The decision-maker for edge cases. When the computer's Accept/Reject decision needs human confirmation (or when a lot is rejected), the approver reviews and makes the final call. Each plan lists its allowed approvers.
5. The three areas
When you open the Inspection Module you see three cards. This is the whole product, organised by what you're trying to do:
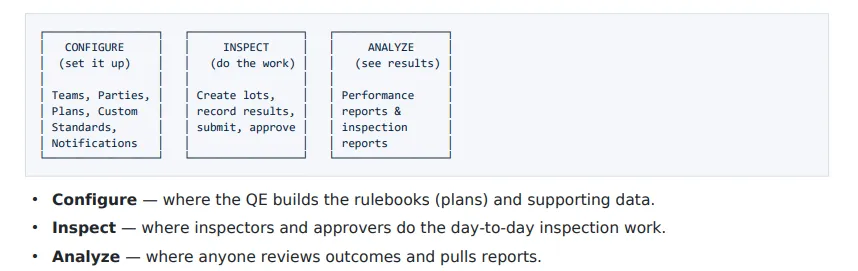
Tip: The left-hand sidebar also has the same groups (Configure / Inspect / Analyze), so you can jump around from anywhere.
6. The end-to-end story
Let's follow one real batch from start to finish, so the pieces click together. Meet Acme Bolts (a supplier) sending us 10,000 M6 bolts.
1. (Configure, done once) The QE creates a plan: "M6 Bolt — Incoming". In it they say: check the bolts for surface scratches (an attribute) and measure the length against 24.9–25.1 mm (a variable), using ANSI Z1.4 at AQL 1.0. They bind Acme Bolts to this plan and list two approvers.
2. (Inspect) The truck arrives. An inspector clicks Add Inspection Lot, picks the part (M6 Bolt), the party (Acme), the plan, and enters the quantity (10,000). The system works out the sample size — say 200 bolts.
3. (Inspect) The inspector opens the lot's workspace. Under Record Attributes they count scratches; under Record Variables they type in the 200 length measurements.
4. (Inspect) They hit Submit. The computer compares the results to the Accept/Reject numbers and says Accepted (few enough defects).
5. (Approver) Because this plan needs sign-off, the lot goes to an Approver, who reviews and clicks Accept. The lot is now Finalised and locked.
6. (Analyze) The finalised lot now appears in View inspection reports, and Acme's good result nudges their track record — over time, good history can move them to Reduced inspection (smaller samples = less work).
That's the whole journey. Now let's go deep on each part
PART A — CONFIGURE
This is the QE's home base: everything you set up before any real inspection happens. Open it from the Configure card (or the Configure group in the sidebar).
Configure contains: Inspection Teams, Parties, Inspection Plans, Custom Standards, and Notification Subscribers.
A1. Inspection Teams
What it is: A named group of your employees who are permitted to inspect against certain plans. Think of it as "the people on shift who are allowed to touch these inspections."
Why it matters: Only members of a plan's assigned team can record results for that plan's lots. This keeps inspection in the hands of trained, authorised people.
How to set one up:
1. Configure → Inspection Teams.
2. Create a team, give it a name (e.g. "DEMO Incoming Team").
3. Add the users who belong to it.
Later, when you build a plan, you'll pick one assigned team for that plan
A2. Parties
What it is: The companies you transact with. A Party is either:
• a Supplier — you inspect goods coming in from them, or
• a Customer — you inspect goods going out to them, or
• an internal factory.
Why it matters: Every inspection is "us vs. a party." Plans are bound to parties, and a party's quality history drives switching (how strict future inspection is).
How to set one up:
1. Configure → Parties → add a party (code + name + type).
2. For many at once, use Bulk Add (paste a list).
Parties are shared master data (they live in the platform core , reused across modules), so a supplier you add here can be reused elsewhere.
A3. Inspection Plans
This is the single most important concept in the module. Everything else supports it.
What is a plan, really?
A plan is a rulebook for one (Part + Inspection Type) combination. For example: "M6 Bolt, Incoming" is one plan; "M6 Bolt, Outgoing" is a different plan.
A complete plan answers five questions:
1. What part, coming which way? → Plan Identity (Part + Inspection Type + Team + Effective Date).
2. How strict, and does it auto-adjust? → Switching Configuration (default switch level + switching mode).
3. What count-based checks? → one or more Attribute Groups (with their NC/NCU characteristics).
4. What measured checks? → one or more Variable Groups (with LSL/USL limits).
5. Who is inspected, and who approves? → Plan–Party Bindings + Approvers
The two ways to build a plan
(1) Create Plan (V2 view) — the recommended, single-page builder. Everything (identity, switching, groups, parties, approvers) is on one screen; you fill it in and save.
(2) Create Plan Bulk — a spreadsheet-style grid to create many plans at once. Each row is one plan header; you save rows as drafts, then configure their groups/parties/approvers via slide-in drawers. *Bulk is for creating fresh plans only* — it will not let you make a new version of a part that already has an Active plan (use "Edit plan" for that; see below).
The Inspection Plans register (the list)
Configure → Inspection Plans shows every plan in a table, grouped by Part No with a box around each group. Columns: Part No, Inspection Type, Effective Period, Status, Team, Description, Parties Mapped, Action.
Reading tips:
• Effective Period tells you the window a plan was the live one — e.g. 2026-04-01 to today (still active) or 2026-04-01 to 2026-07-12 (retired on that date). Drafts show "Not Applicable" (they were never live).
• Within each part, rows are ordered Inactive → Active → Draft, and each newer version is indented one step to the right with a connector, so you can read the version history like a little staircase.
• Action → view opens the plan's detail page
The plan lifecycle (Draft → Active → Inactive)
A plan is always in exactly one of three states:
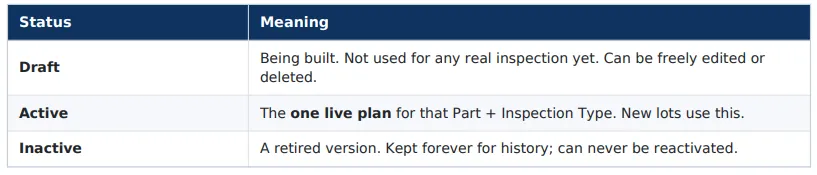
The golden rule: there is at most one Active plan per (Part + Inspection Type) at any time. Everything else is a Draft or Inactive.
To make a Draft go live, open it and Save & Activate (it must first have at least one group, one bound party, and one approver).
"Editing" an Active plan = making a new version
Here's a subtlety that trips people up. An Active plan is locked — you cannot change its content directly, because real lots may already have been inspected against it (audit rule).
So when you want to change a live plan, you "Edit plan", which actually:
1. Opens a copy of the plan, pre-filled with everything, in an edit screen.
2. Lets you tweak whatever you want.
3. On Edit & Activate, it creates a new version (the next version number) and marks the old one Inactive. Any lots still under inspection on the old plan move to the new one; already-submitted/finalised lots stay frozen on the version they ran under.
You reach this two ways:
• On the plan detail page, the Edit plan button.
• On the Create Plan screen, if you pick a Part + Type that already has an Active plan, a box pops up: "An existing inspection plan was found." Click Edit plan to edit it, or Create fresh plan to start over for a different part/type.
You can also Save as Draft from the edit screen — this parks your changes as a Draft sitting beside the still-live Active plan, to finish and activate later. While such a draft exists, any open lots on the current plan show "Superseding in process" as a heads-up
Marking a plan Inactive (retiring it)
On a plan's detail page, Mark Inactive retires it. This is terminal — it can't be undone; you'd create a new version instead. Existing open lots and drafts keep working; only new lots are blocked.
Inside a plan, section by section
• Plan Identity — Part, Inspection Type (Incoming/Outgoing), Assigned Team, Effective Date.
• Switching Configuration — the default switch level (usually Normal) and the switching mode (Manual/Auto, with or without override). See Section 10. If the plan uses a Custom Standard, the switching fields are turned off (custom standards define their own sampling).
• Attribute Groups — count-based checks. Each group has a decision type (Individual = judge each characteristic on its own, or Collective = pool them), a severity (Critical/Major/Minor), a sampling standard (Z1.4, c=0, Fixed, Percentage, or Custom), and a list of NC and NCU characteristics.
• Variable Groups — measured checks (always ANSI Z1.9). Each has characteristics with LSL/USL limits and a sigma method.
• Plan–Party Bindings — which parties this plan applies to, with optional per-party tweaks.
• Approvers — the people allowed to make the final call.
A4. Attribute Groups & Variable Groups
These are the "checklists" bundled inside plans. You normally build them inside the plan builder, but they also have their own reference pages (reachable from the sidebar) and bulk tools if you want to prepare many at once
Attribute Groups (count-based)
An attribute group collects characteristics you count, and applies one sampling rule to them. Key ideas:
• NC vs NCU — decide, per characteristic, whether you're counting defects (NC, uncapped) or judging whole units OK/NOK (NCU, capped at the sample size).
• Standard — pick how the sample size and Accept/Reject numbers are derived:
• ANSI Z1.4 — the classic standard; needs an inspection level (I/II/III or S1–S4) and an AQL.
• c=0 (Squeglia) — accept only if zero defects found; needs an AQL.
• Fixed sample — you set the sample size + accept/reject numbers by hand.
• Percentage sample — sample a % of the lot.
• Custom standard — use one of your own tables (see A6).
• Decision type — Individual (each characteristic passes/fails on its own) or Collective (defects across the group are pooled).
Variable Groups (measured)
A variable group collects characteristics you measure, always using ANSI Z1.9. For each characteristic you set the LSL (lower limit), USL (upper limit), and whether the standard deviation is known or unknown (σ-known / σ-unknown). Z1.9 uses the actual spread of your measurements to decide accept/reject — it's more powerful than counting because a measurement tells you how close to the edge you are, not just pass/fail.
A5. Plan–Party Bindings
What it is: the link that says "this plan applies to this party." A plan with no bound parties can't be activated.
Per-party overrides: each binding can, if you want, override the plan defaults for that one party — its own switch level, switching trigger, auto-approval/auto-reject flags. Leave them as "Inherit from plan" to just use the plan's settings.
Two special flags per binding:
• Production steady (Yes/No) — marks a party as being in stable production (relevant to switching eligibility).
• Reduced eligible (Yes/No) — whether this party is allowed to drop to Reduced inspection.
If either is "Yes", a small justification note is captured.
Discontinued & CAPA: if a binding becomes Discontinued (a supplier's quality collapsed), no new lots can be created for it until an approved Corrective Action (CAPA) clears it. See B10.
A6. Custom Standards
What it is: your own sampling table, for when the published standards (Z1.4, c=0) don't fit your process. You define, per lot-size range, the sample size and acceptance number (reject number is automatically Ac + 1).
How to use it: create the custom standard in Configure → Custom Standards, then pick it as the "standard" on an attribute group inside a custom plan.
A7. Notification Subscribers
What it is: who gets an email when inspection events happen (a lot decision, a switch- level change, a CAPA request, etc.).
How to use it: Configure → Notification Subscribers → subscribe a team or a user, and scope it to one specific plan or all plans. Sent emails are tracked in the Notification Outbox.
PART B — INSPECT
This is where the real work happens: creating lots, recording what you found, submitting, and approving. Open it from the Inspect card.
B1. The Inspect page
Clicking Inspect opens one combined table of your live inspection work, with a header that reads "Inspect" and an Add Inspection Lot button on the far right. It has two tabs:
• Under Inspection (selected by default) — lots currently being worked on (being measured, submitted, or awaiting an approver).
• Drafts — half-finished lot forms you saved to finish later. Only open drafts appear here (completed/discarded ones drop off).
Both tabs have two extra tick columns — Original and Resubmission — that mark, with a green check, whether each row is a first-time inspection or a re-inspection of a previously rejected lot.
From a row you can Inspect (open the workspace), View details, or Deactivate the lot; from a draft row you can Open or Discard it.
B2. Creating a new inspection lot
A lot is a real inspection event. Click Add Inspection Lot and:
1. Pick the Part. The screen then offers only the parties that have a plan for that part.
2. Pick the Party, then the Plan (the dropdowns cascade — each choice narrows the next).
3. Enter the lot quantity (how many items are in the real batch). This drives the sample size.
4. Optionally add GRN / PO numbers, receipt details, attachments.
5. Confirm the switch level — the system shows the level this lot will be inspected at, frozen at creation so it can't drift mid-inspection. 6. Save Draft (finish later) or continue straight into recording results
Blocked? If the plan-party binding is Discontinued, the system won't let you create a lot until a CAPA is approved. If an Active plan doesn't exist for the part, there's nothing to inspect against yet.
B3. Drafts
You rarely finish a lot in one sitting, so the system lets you save a draft at any point and come back. Drafts appear on the Inspect → Drafts tab. Open one to continue; Discard to throw it away (it can't be reopened once discarded). Drafts you started elsewhere (e.g. via the plan tools) show up here too
If the underlying plan has been superseded since you saved the draft, the system offers to migrate your draft to the current plan version so you don't lose your work.
B4. The inspection workspace
Opening a lot (Inspect) drops you into the workspace — the screen where all the real data entry happens. Along the top are tabs:


You can save your progress at any time; the top of the page tracks how many required fields are still empty. Breadcrumbs and a Back to Inspect button always return you to the Inspect page
B5. Recording Attributes
The Record Attributes tab is a grid — one row per characteristic across every attribute group on the plan. Each row shows its Group, Characteristic, Type (NCU or NC), the Sample size, a Count, and a Note.
There are two ways to enter counts, chosen with the Compact / Cell view toggle:
(1) Compact view — a simple −/ stepper (and a typeable box) per row. You just enter the total number of defects (NC) or bad units (NCU) you found. Fast when you already have the tally.
(2) Cell view — a per-sample calculator. Each of the S1, S2, …, Sn columns is one inspected item:
• For NC rows, type how many defects that single item had; the system sums them into the Count.
• For NCU rows, click the button to toggle OK ↔ NOK; the system counts the NOKs.
Cell view is great when you want an item-by-item record rather than just a total.
Rules to know:
• You can only switch views when all counts are back to zero (the system will ask you to reset first). This prevents mixing the two entry styles.
• If a lot was submitted in Cell view, it's locked to Cell view afterwards (sticky).
• NCU is capped at the sample size (a unit is either OK or NOK, so you can't have more bad units than units). NC is uncapped (one item can have many defects).
• Running per-group NC totals update live in the summary cards below the grid.
• Inspectors deliberately do not see AQL / Ac / Re here — just what to count
Click Save Attributes to persist. (Note: this grid is an AG-Grid table; rows auto-size so long group names are never cut off.)
B6. Recording Variables
The Record Variables tab is a spreadsheet-style grid (AG Grid). By default:
• Rows = samples (Sample 1 … Sample n).
• Columns = the measured characteristics, grouped under their variable-group headers, each header showing the LSL/USL limits
You type the measured number into each cell. Cells beyond a characteristic's required sample size are greyed out. A Transpose button flips the orientation (rows become characteristics, columns become samples) if you prefer entering one characteristic at a time.
As you type, cells are colour-cued (green = unchanged saved value, orange = new/changed), and a status pill counts how many readings are filled. Click Save Variable Measurements to persist.
B7. Submitting a lot
When all required values are in, go to the Summary tab and hit Submit. Now the computer does the maths:
1. It compares your recorded results to the Accept/Reject numbers for each group (derived from the standard, lot size, AQL, and switch level).
2. It produces an Algorithm Decision: Accepted or Rejected.
3. Then it decides whether a human needs to confirm:
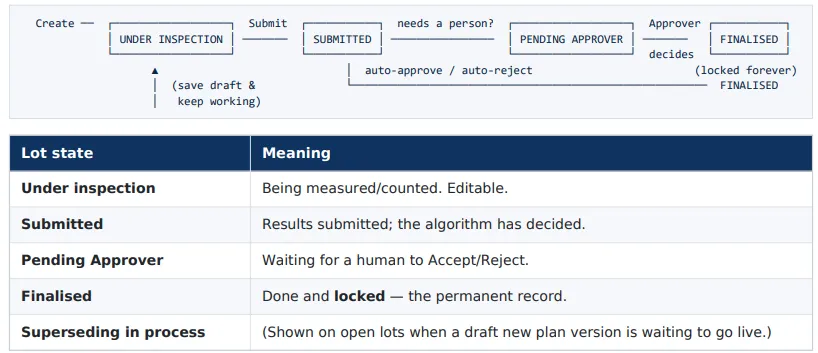
• If the plan/party is set to Auto-approval, the lot is System-approved and finalised immediately.
• If set to Auto-reject, it's System-rejected and finalised. • Otherwise the lot moves to Pending Approver and waits for a person.
So "Submit" doesn't always mean "done" — sometimes it means "sent to the approver."
B8. The Approver's job
When a lot is Pending Approver, an authorised approver opens it, reviews the results (there's a printable approver preview PDF), and makes the final call on the Approver tab:
• Accept → the lot is Finalised as accepted.
• Reject → the lot is Finalised as rejected (and the supplier's record takes the hit).
Once finalised, the lot is locked — no more edits, ever. The five possible approver outcomes are: Pending, Accepted, Rejected, System-approved, System-rejected (the last two are the automatic ones from B7).
B9. Rejected lots & Resubmission
A rejected batch isn't always the end of the story. Often the supplier reworks the batch (or you re-screen it) and it gets inspected again. That second inspection is a Resubmission.
From a rejected lot, the approver can Submit for resubmission, which spins up a fresh inspection (linked back to the original as its parent). Resubmission lots are flagged throughout the system (that's the Resubmission tick column on the Inspect page) so your reports can tell first-time quality apart from after-rework quality.
B10. Corrective Actions (CAPA)
When a supplier's quality gets bad enough that their plan-party binding goes Discontinued, the system blocks new lots for them. To resume, someone must raise and get approval on a Corrective Action (CAPA) — a record of "here's what went wrong and how we fixed it."
• Raise one from Inspect → Corrective Actions (this page is currently reachable via the sidebar).
• A CAPA has a status: Pending → Approved / Rejected.
• Only an Approved CAPA unblocks new inspection lots for that plan-party.
B11. Notification Outbox
Every email the system generates (lot decisions, switch changes, CAPA requests, etc.) is logged in the Notification Outbox. It's a monitoring screen showing each message's status — Pending, Sent, Failed, Cancelled — so you can confirm the right people were told. Who gets emailed is controlled by Notification Subscribers.
PART C — ANALYZE
Open it from the Analyze card. This is the read-only, reporting side of the module — for anyone who wants to see outcomes rather than do inspections.
Performance Reports
• Performance Measurement — the flagship report. Pick a Part, a Party, or a Plan and drill down: from the selection into per-plan and per-party detail, seeing how lots are performing, acceptance rates, and switching streams. It answers "how is this supplier / part / plan doing over time?"
• View inspection reports — the list of finalised lots. Open any one to see its full, printable inspection report and complete audit trail (who inspected, what they found, who approved, when). The card shows live counts of finalised originals vs resubmissions.
There is also a "Browse & Consolidated Results" section (a flat, filterable table of every part/plan/party combination, plus group-level results). It is currently hidden on the Analyze page but fully preserved in the code, so it can be switched back on later without rebuilding. Those screens remain reachable from the sidebar
10. Switching levels explained
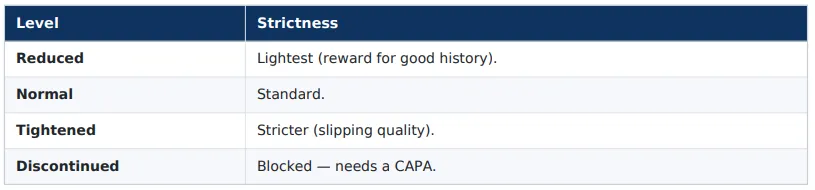
Switching is the clever bit that makes inspection fair and efficient: it rewards suppliers with good track records and clamps down on poor ones, automatically adjusting how much you inspect. There are four levels:
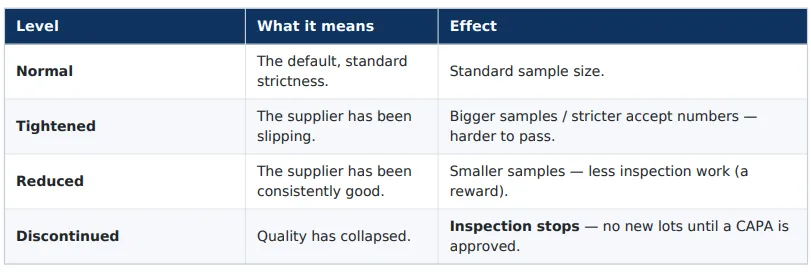
How a party moves between levels: based on their recent run of accepted/rejected lots (the classic ANSI Z1.4 switching idea — a string of good lots earns Reduced; rejects push toward Tightened; sustained failure hits Discontinued).
Manual vs Auto (the switching mode): each plan's Switching Configuration decides whether level changes happen automatically or require a manual decision, and whether per-party overrides are allowed:
• Auto – no override — the system moves the level, and nobody can hand-override it.
• Auto – allow override — the system moves it, but a user may override per party.
• Manual – no override / allow override — a person sets the level.
Each lot freezes its switch level at creation, so a level change mid-inspection never corrupts a lot in progress. Only Reduced-eligible parties can drop to Reduced.
11. Sampling standards explained simply
A sampling standard is just a lookup rule: "given a batch of this size and a quality bar (AQL), inspect this many items and accept if defects ≤ this number." The module supports several:
• ANSI Z1.4 — the world's most common attribute standard. You choose an inspection level (II is the default/normal; I is lighter, III is heavier; S1–S4 are small special samples) and an AQL. The standard's tables then give the sample size and Ac/Re. Switching (Normal/ Tightened/Reduced) plugs directly into it.
• c=0 (Squeglia) — a stricter, simpler cousin: accept only if zero defects are found. Popular where any defect is unacceptable. Also driven by an AQL.
• Fixed sample — you skip the tables and just say "inspect N items, accept if ≤ Ac." Full manual control.
• Percentage sample — inspect a fixed percentage of the batch. • Custom standard — your own table (see A6).
• ANSI Z1.9 — the standard for variables (measurements). Instead of counting defects, it uses the spread and average of your measurements versus the LSL/USL to decide. More statistically powerful than counting.
AQL in one line: a lower AQL (e.g. 0.65) is stricter (you tolerate fewer defects) than a higher one (e.g. 4.0
12. The plan lifecycle

• A plan starts as a Draft, gets Activated, and there's only ever one Active version per Part + Inspection Type.
• You never edit an Active plan directly. "Edit plan" copies it, and Edit & Activate creates the next version while retiring the old one to Inactive.
• Inactive is forever — retired versions are kept for audit and can't be brought back; you'd make a new version instead. • Both retired reasons (superseded by an edit, or explicitly deactivated) simply display as Inactive.
13. The lot lifecycle at a glance
14. Cheat-sheets
Plan statuses

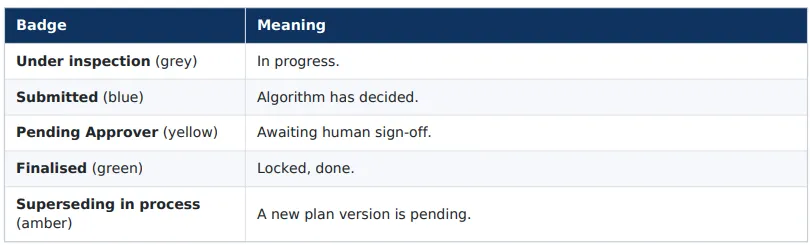
Lot states
Decisions

Attribute types

Switch levels
15. Quick "How do I…?" recipes
…create a plan for a new part? Configure → Inspection Plans → Create Plan (V2 view) → fill Identity, Switching, add at least one Attribute or Variable group, bind at least one party, add at least one approver → Save & Activate.
…create lots of plans at once? Configure → Inspection Plans → Create Plan Bulk → fill rows → tick them → Save as Draft → open each to configure groups/parties/approvers → activate. (Fresh plans only.)
…change a plan that's already Active? Open the plan → Edit plan → make changes → Edit & Activate (creates a new version and retires the old one). Or Save as Draft to finish later.
…retire a plan without replacing it? Open the plan → Mark Inactive (terminal — can't be undone).
…inspect an arriving batch? Inspect → Add Inspection Lot → pick Part → Party → Plan → enter quantity → confirm switch level → record Attributes and Variables → Submit.
…finish a lot I started yesterday? Inspect → Drafts tab → Open the draft.
…approve or reject a lot? Inspect → Under Inspection → open a Pending Approver lot → Approver tab → Accept/Reject.
…re-inspect a rejected batch after rework? Open the rejected lot → Submit for resubmission → inspect the new (Resubmission) lot.
…unblock a Discontinued supplier? Inspect → Corrective Actions → Raise a CAPA → get it Approved.
…see how a supplier is performing? Analyze → Performance Measurement → pick the Party → drill down.
…read a finished inspection's full report? Analyze → View inspection reports → open the lot.
…control who gets notified? Configure → Notification Subscribers → subscribe a team/user to a plan or all plans.
16. FAQ & gotchas
Q: Why can't I edit an Active plan's checks directly? Because real lots may have been inspected against it. Editing it would rewrite history. Use Edit plan to make a new version instead.
Q: I edited a plan but the old lots didn't change. Bug? No — that's by design. Already-submitted/finalised lots stay frozen on the version they were inspected under. Only lots still under inspection migrate to the new version.
Q: The Drafts tab shows fewer drafts than I expected. The Inspect → Drafts tab shows only open drafts. Completed and discarded ones are hidden (they're kept for audit but aren't active work).
Q: I can't create a lot for a supplier. Check three things: (1) is there an Active plan for that part + type? (2) is the party bound to the plan? (3) is the binding Discontinued (needs a CAPA)?
Q: Compact vs Cell view — which should I use for attributes? Compact if you already have a total tally. Cell view if you want an item-by-item record. You can't switch once counts are entered without resetting, and a lot submitted in Cell view is locked to Cell view.
Q: What's the difference between "Submitted" and "Finalised"? Submitted = results are in and the algorithm decided; it may still need an approver. Finalised = completely done and locked forever.
Q: Nothing was deleted when I "removed" a plan — is that right? Yes. Retiring is Mark Inactive; the record is kept for audit. The system almost never truly deletes regulated data.
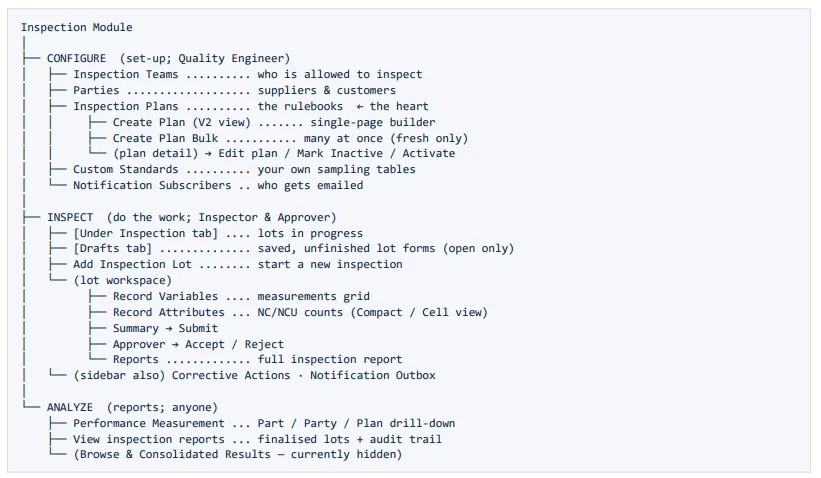
17. Where everything lives (navigation map)
A final word
The whole module boils down to a simple, trustworthy loop: the QE writes the rules → the inspector follows them and records the truth → the computer (and, when needed, an approver) decides → the result is stored forever and shapes future strictness. Everything in this guide is just the detail around that loop. Welcome aboard — you now know the Inspection Module end to end.The whole module boils down to a simple, trustworthy loop: the QE writes the rules → the inspector follows them and records the truth → the computer (and, when needed, an approver) decides → the result is stored forever and shapes future strictness. Everything in this guide is just the detail around that loop. Welcome aboard — you now know the Inspection Module end to end.
This guide describes the Zometric OMS Inspection Module as built.